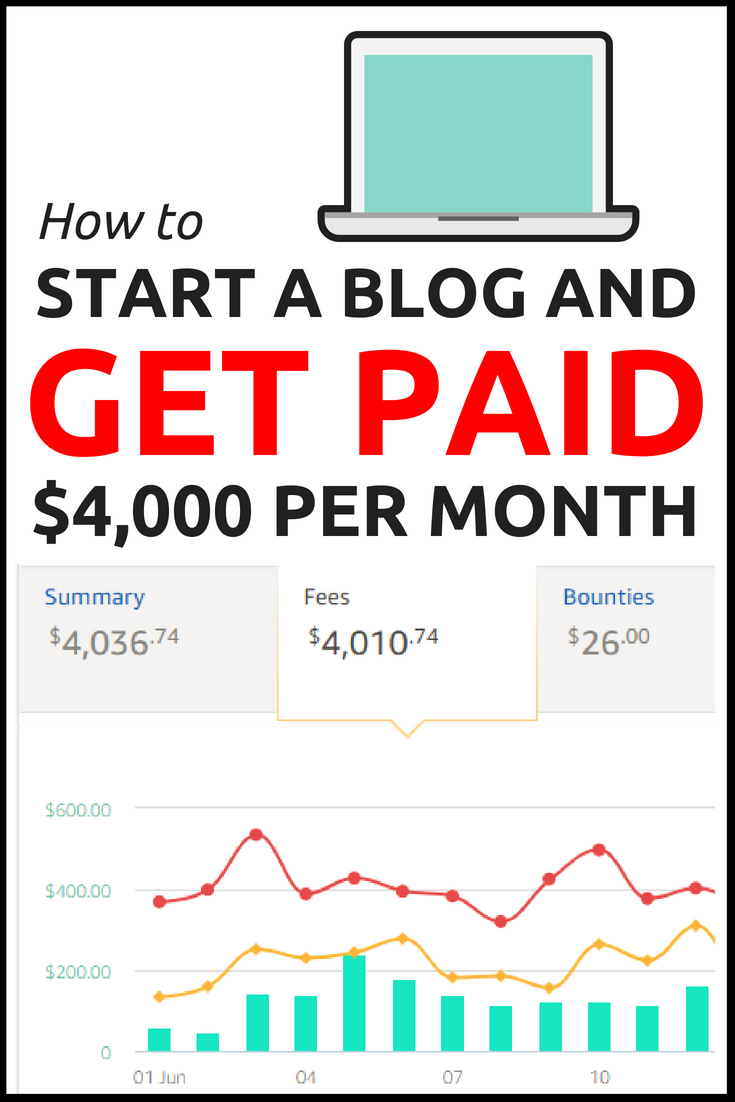
How to Start a Blog and Get Paid From ANYWHERE ($10k+ Monthly Income!)
Are you wondering how to start a blog and get paid? How to make money online? In this guide, I walk you through exactly how to start a blog and make money online in 8 simple steps. You’ll learn everything from how to start a website to coming up with a blog niche, topic ideas, and


Are you wondering how to start a blog and get paid? How to make money online?
In this guide, I walk you through exactly how to start a blog and make money online in 8 simple steps.
You’ll learn everything from how to start a website to coming up with a blog niche, topic ideas, and monetizing your blog posts.
The best part?
You can do this even if you have NO experience building a website, making money online, or marketing a business.
It’s a complete beginners guide!
If you’ve ever thought to yourself, “I want to start my own blog, but I have no idea where to begin”, this guide is for you. It’s all about making money!
A blog is an essential asset that will make you money for years to come. So let’s get you earning ASAP!
First Off, Why Should You Trust Me? (Hint: We Make $4,000 per Month Blogging)

My name is Bill Widmer. I’ve been running online businesses for over 10 years.
Over those years, I’ve offered SEO and blogging services to dozens of clients, including power houses like BDOW, Oberlo, Single Grain, Ahrefs, and many more.
We’ve brought these clients tens of thousands of dollars in revenue and hundreds of thousands of site visitors – all through blogging.
In addition to that, I run a travel blog, The Wandering RV, which currently makes over $10,000 per month in passive income.
Want proof? Check it out:
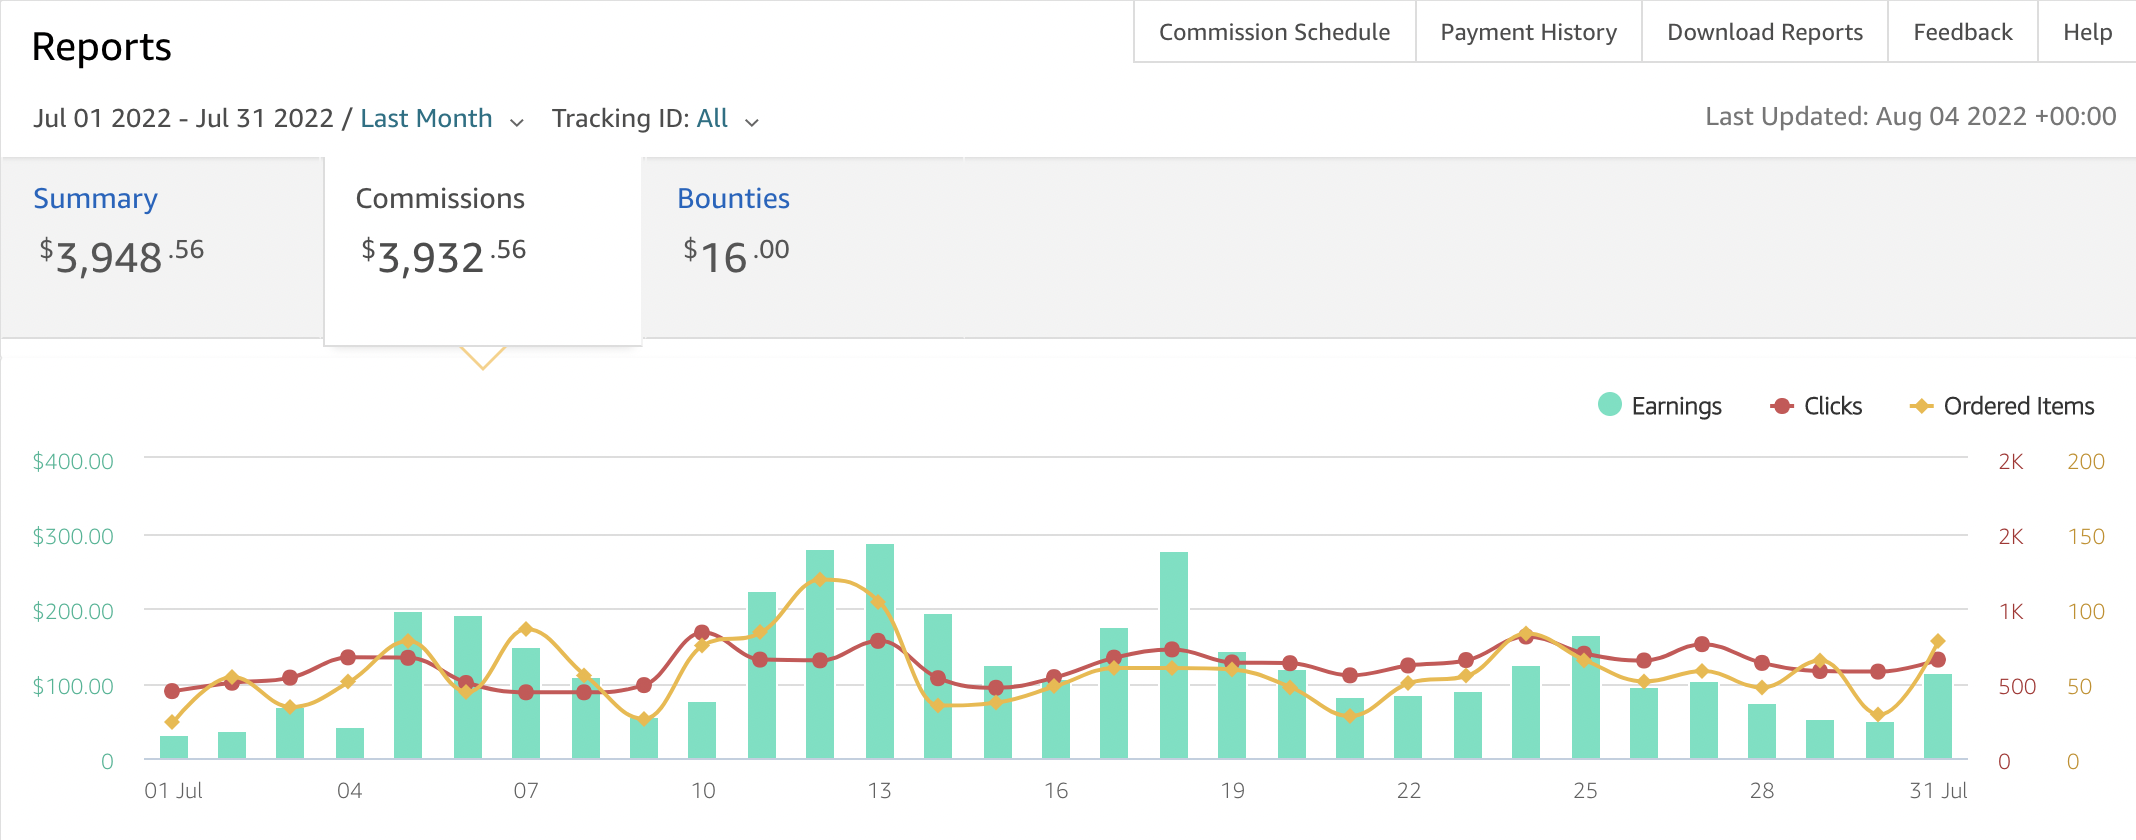
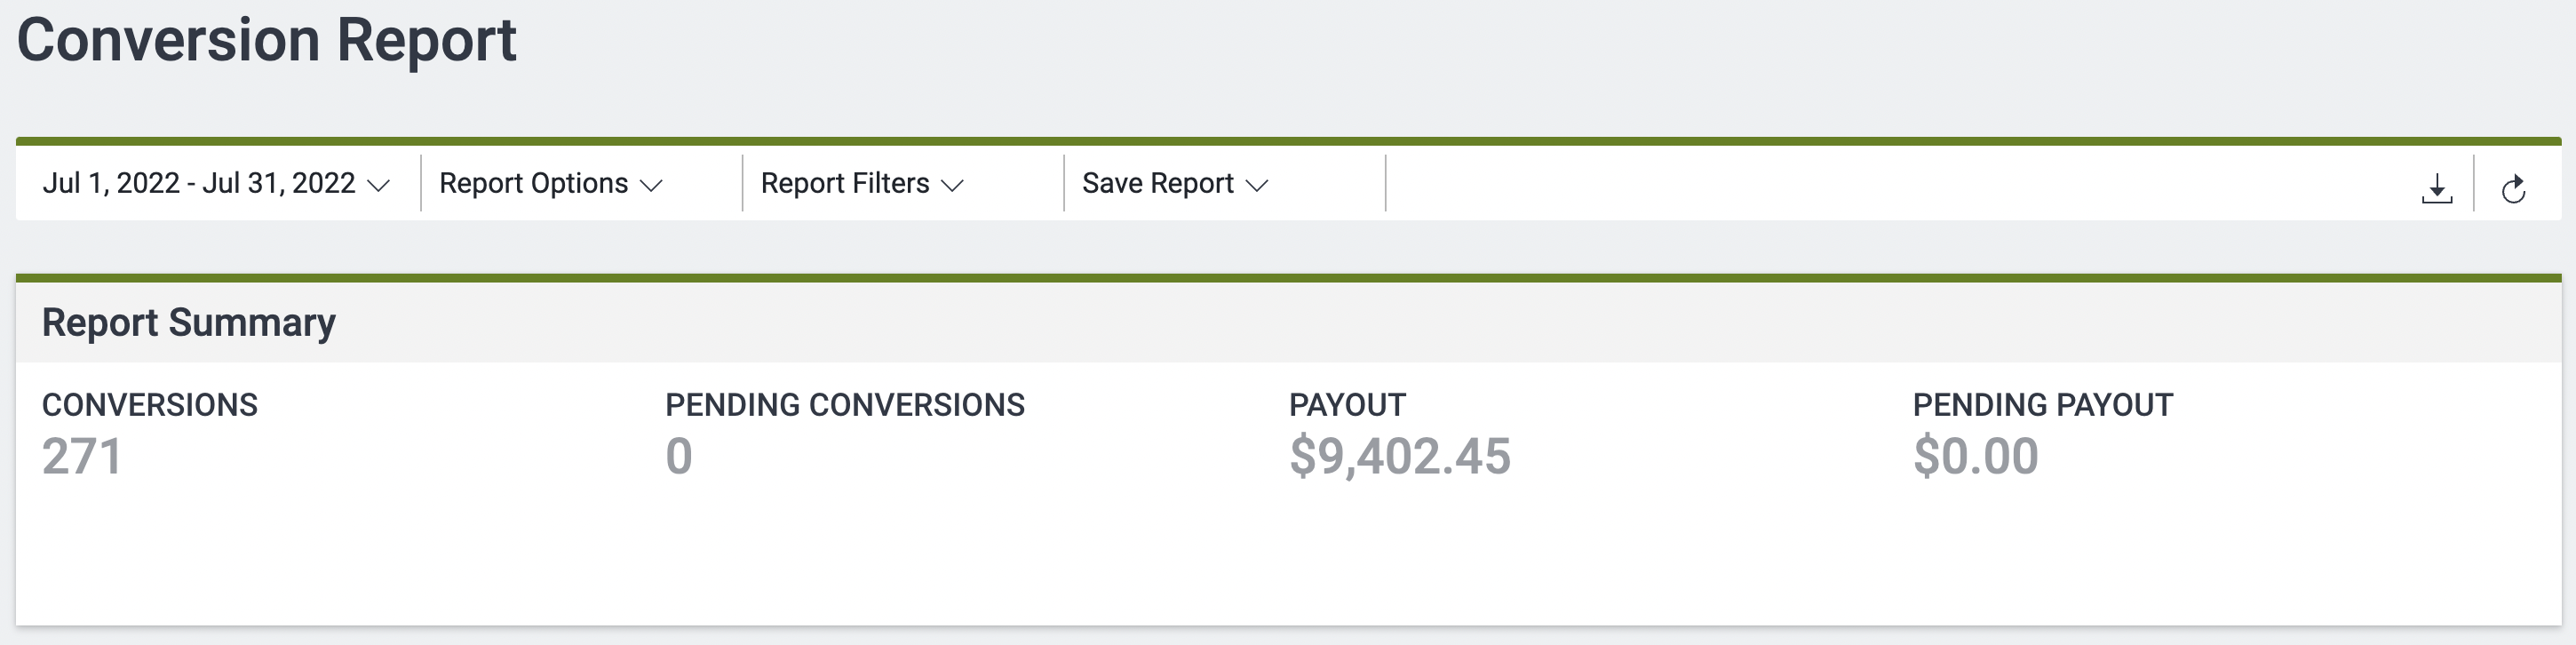
That’s just from two of our Affiliates – only one of several ways I make money blogging. Pretty cool, right?
But listen – you don’t need years of experience building websites or marketing to make this work.
In fact, you can learn how to start a blog that makes money—basically everything I know—just by grabbing a coffee, reading this article, and putting in the work.
I promise you that if you follow the steps in this article and do the work, you will become a paid blogger in just a few months.
Sound good? Good—here’s what to do next.
How to Use This Guide
This post is in-depth and, at times, can seem a bit complex or overwhelming.
This is to be expected! Learning how to start a blog has a steep learning curve, but it’s worth it. Just don’t give up!
I do my best to break things down into bite-sized chunks and explain these in layman’s terms.
However, you may need to bookmark this page and come back to it several times to fully grasp all the concepts. That’s to be expected—don’t let it deter you from getting started!
My advice? Getting started is better than trying to start perfectly.
I didn’t have all the answers when I started, and neither do most people. You learn through experience and practice.
Take everything at your own pace and if you have any questions, leave a comment below or email me at mail [at] billwidmer.com. I’ll do my best to help you in any way I can!
Without further ado, here are my 8 easy-to-follow steps to start a self-hosted WordPress blog, no technical experience required!
Here are a few FAQs to start:
What Is a Blog? (Click to Reveal)
A blog is like an online magazine where you share tips, tricks, and news around a certain topic.
To set up a blog you need to purchase one or more domain names, buy hosting from a web hosting company, install WordPress, and write some great content.
It helps to learn search engine optimization and how to collect your visitor’s email address, which I will teach you in this guide!
How Do Beginner Bloggers Make Money? (Click to Reveal)
When starting a blog, the most common ways for making money online are through display ads shown on your website through Google AdSense, working with an affiliate program like Amazon to promote other people’s products, and selling digital products like an online course or ebook.
As long as you do your due diligence with keyword research, create great content, and promote your blog (all of which I will teach you in this guide), you’ll be able to make money right away!
How Many Blog Views Do You Need to Make Money? (Click to Reveal)
This depends on the niche you’re in and how profitable it is. Generally, you need at least 10,000 pageviews per month to start making money online with display ads.
However, money from blogging goes up exponentially when you sell high-commission affiliate products like insurance, rentals, or high-end products. In these low-volume, high-cost niches you can start a money making blog with just a few hundred visitors.
Step 1: Figure Out What to Blog About
Before you learn how to start a blog and make money online, you need to figure out what the hell you even want to write about.
In this step, we’ll cover:
- How to brainstorm blog topic ideas
- What makes a good vs a bad niche
- How different niches can be monetized
- How to pick a winning niche from your list
Here we go!
How to Brainstorm Topic Ideas
You might have a few ideas of what you want to blog about. If so, that’s great! If not, don’t worry—this section will help you come up with ideas.
To come up with blog post ideas, ask yourself the following questions and make a list of your answers (I like to use Google Sheets for this):
- What am I really good at?
- What do I really like doing?
- What do I know a lot about?
- What do other people tell me I’m good at or know a lot about?
- What am I curious about, but don’t necessarily know much about?
After answering these, you should have at least a few ideas. Take your list and compare it to what makes a good or bad blog niche below.
For example, here are my answers:
- What am I really good at? SEO, affiliate marketing, fitness, video games.
- What do I really like doing? Hiking, traveling, writing, playing games, jiujitsu.
- What do I know a lot about? Business, psychology, finances, video games.
- What do other people tell me I’m good at or know a lot about? Listening, writing, giving people ideas, inspiring others.
- What am I curious about, but don’t necessarily know much about? Overlanding, making music, traveling abroad, dancing, skydiving.
Based on my answers, I have plenty of obvious blog niches to choose from: Travel blog, entrepreneurship blog, a blog about video games or a blog on becoming a better writer.
I could even start a blog about making music or dancing, despite not knowing anything about it, simply because of my curiosity around it.
Of course, there’s always the chance I realize this niche won’t make any money or I won’t actually like writing about it. So that gets me to my next point.
What Makes a Good vs a Bad Niche?
Not all blog niches or topic ideas are good enough to be a long-term income stream. This section will help you decide which of yours are good enough.
A good niche will:
1. Have opportunity to earn money.
Even if a topic is hugely popular (like video games, for example), that doesn’t mean it’s a good way to make money online.
For each item in your list, ask yourself:
- Are there products I can review in this niche? Are they decently priced ($50+)?
- Do I know of any online courses in this niche I could promote?
- Can I eventually create my own products in this niche?
- Does this niche have any big-earning opportunities, such as insurance, loans, or rentals? (For example, RV rentals or home insurance.)
If you said yes to at least one of these questions, it may be a good niche. Continue with those.
2. Be low-medium competition.
Some competition is good (since it means there’s money to be made), but too much can make it extremely difficult to achieve page one search engine rankings.
Ideally you should get a tool like Ahrefs or Semrush to tell you how difficult keywords are at a glance. But if these tools are too expensive for you, just Google things in the niche you’re thinking of writing about (like “woodcrafting” or “journaling”) and follow the short guides below.
How to See Competition Using Ahrefs (Click to Reveal)
Think of some keywords you might want to rank for in your niche (like “best hand saw”) and plug it into Ahrefs Keyword Explorer.

You’ll see Ahrefs Keyword Difficulty (KD) score.
This tells you roughly how difficult it will be to rank for that keyword on a scale from 0-100 with 0 being the easiest. KD is largely based on how many backlinks the search results have (more on backlinks in step 7).
If you’re consistently seeing KDs of 40+, it’s going to take you at least a year or two to rank for those keywords unless you already have a strong backlink profile. I like to aim for keywords with a KD of less than 20 when just starting, preferably less than 5 for my first few articles.
How to See Competition WITHOUT Ahrefs (Click to Reveal)
Grab some of the top results for your chosen keyword (like “best hand saw”) and plug them into Moz’s Open Site Explorer tool.
Moz will tell you how many “established links” that post has. This is the number of backlinks the given URL has from other websites. Pages with a lot of links from other sites will be difficult to outrank on Google’s search results page, as this is one of Google’s top ranking factors.
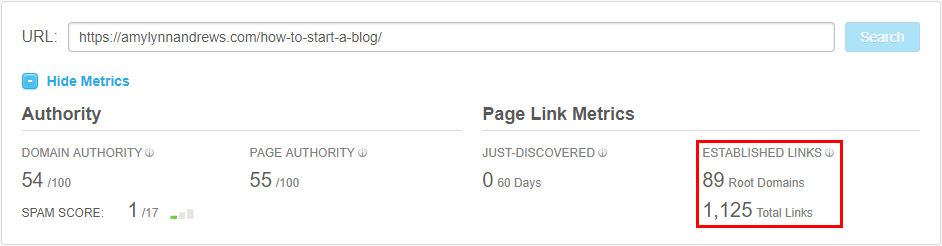
I recommend looking for keywords with fewer than 5 backlinks pointing to the top pages when you’re just starting out.
Now, let’s talk about the important part – money!
Related Reading: Ahrefs vs SEMrush: Which is Better?
How Can Different Niches Be Monetized?
There are a lot of ways to make money with your blog. But the main one’s (which I’ll cover in more detail in step 8) are:
- Affiliate Programs: You promote other people’s products, courses, or services and make a commission on any sales. Also called affiliate marketing.
- Physical Products: You dropship or manufacture your own physical products to turn your blog into an online store.
- Infoproducts: You create an eBook, online course, or other digital information-based product to sell on your website.
- Paid Ads: You display other people’s ads on your site and get paid per click or per impression. For example, using a platform like Ezoic or AdThrive to display ad space.
- Sponsored Posts: Other people pay you to write a post on your site promoting their product or brand.
Which way(s) you choose to monetize largely depends on your niche and what you’re comfortable doing. If you’re not sure how your niche is able to be monetized, just search in Google for other blogs in your niche and see what they’re doing to make money. It’s usually pretty obvious.
For example, if I search “video game blogs” I find thatvideogameblog.com and notice they are monetizing through gaming gear reviews…
…as well as earning an affiliate commission on certain video game sales through their reviews.
All you need to do is browse blogs in your chosen niche and look for any affiliate links, ads, and any other obvious ways they are making money. I recommend making notes in your spreadsheet as you do this!
Now, let’s pick some winners!
How to Pick a Winning Niche From Your List
By now you should have a good idea of which topics you could use.
If you followed along, you should have deleted or crossed off any niches on your list that aren’t a good fit, based on the last three sections. If you didn’t, go do that now.
Once you’re done, look at what’s left. If you have more than one idea, use the following questions to prune that list down to one:
- Which of these topics can I see myself being interested in for a long time?
- Would I be open to letting other people ghostwrite my articles in this niche if I get bored of it or want to put my focus elsewhere?
- Which of these niches have more than one opportunity to make money? (As in, you could potentially do affiliates, paid ads, an online course, and sell your own products, all within one niche.)
Only you know what’s right for you. But what if you still have more than one idea and aren’t sure which one to go with?
Just pick one and roll with it! The beauty of starting a blog is that you’re not limited to one website or one idea. You can try one out, and if you don’t like it, start a completely different site with a different topic!
Plus, in the mean time, that first site you started will start to age. Your domain’s age is a ranking factor in Google’s search results; the longer your domain is around, the better the chance to rank on Google! So you can always come back to it later.
The important thing is to get started and get practice. You’re building an asset that will generate income for you for a lifetime. It’s OK if you don’t get it right the first time!
Once you’ve got your blog topic, move on to step 2.
Step 2: Buy Your Domain Name & WordPress Website Hosting
Ahh, this is exciting! If you’ve completed step 1, it means you’re ready to buy your domain name and get your website online!
Domain names are the URL you type into the web address bar at the top of your browser (www.thisisadomainname.com).
This step is super easy and quick, so let’s get ‘er done! But first, some FAQs…
FAQ: How Much Does It Cost to Start a Blog?
A domain name runs $10-$15 per year and hosting costs around $5-$10 per month, usually paid up front (so around $90-$120).
This will be fine for 6-12 months when first starting a blod. You’ll probably need to upgrade to premium services eventually (once you have lots of traffic and money!), but that isn’t necessary to start out.
Click here to purchase your domain name and hosting from SiteGround, or keep reading to learn how to do it step-by-step!
FAQ: Can You Start a Blog for Free?
Yes, if you’re doing it for fun or as a hobby.
But if you want to make money from your blog, I don’t recommend starting a free blog.
Why? A few reasons…
- Most free blogging platforms require you to pay to actually make money.
- Without a paid domain name, you’ll have something ugly like myblog.blogger.com. This is bad for ranking on search engines and harms trust with your readers.
- Free blogs are very limited in what you can do in terms of design and features.
And so much more. But if you still want to know how to start a blog for free, check out Blogger. I actually had a Blogger blog for a few years!
Why a WordPress blog? Because it’s super easy to use and is widely accepted as the best blogging platform in the world! In fact, currently 43% of all websites on the internet use WordPress.
Now, you can go about step 2 in two ways…
- You can get a domain name somewhere for a bit cheaper, then change the Domain Name Servers (DNS) to point to your hosting provider.
- Or, you can get your domain name and your hosting from the same provider, so you won’t have to set anything up.
Personally, I always choose method #2 when starting a blog because you’re only saving about $5-$8 by doing them separately, which isn’t worth the aggravation.
Plus, if you make any changes to your hosting and need to change the DNS but forget who you bought your domain name through (which I’ve totally done before), it’s a big pain to figure it out and change everything.
So, what web hosting should you use?
I recommend a hosting provider I’ve personally paid for, used, and loved for years. (Note: As a long-time paying customer, the links below are my referral links. This means, at no additional cost to you, I earn a commission if you make a purchase.)
I recommend SiteGround because they have fantastic, high-speed hosting at great prices AND they have an awesome customer service department. They’re also officially approved by WordPress, the blogging platform we’ll use to create your blog.
If you need something transferred for you or a question answered, the guys and gals at SiteGround go above and beyond to make sure you’re well taken care of.
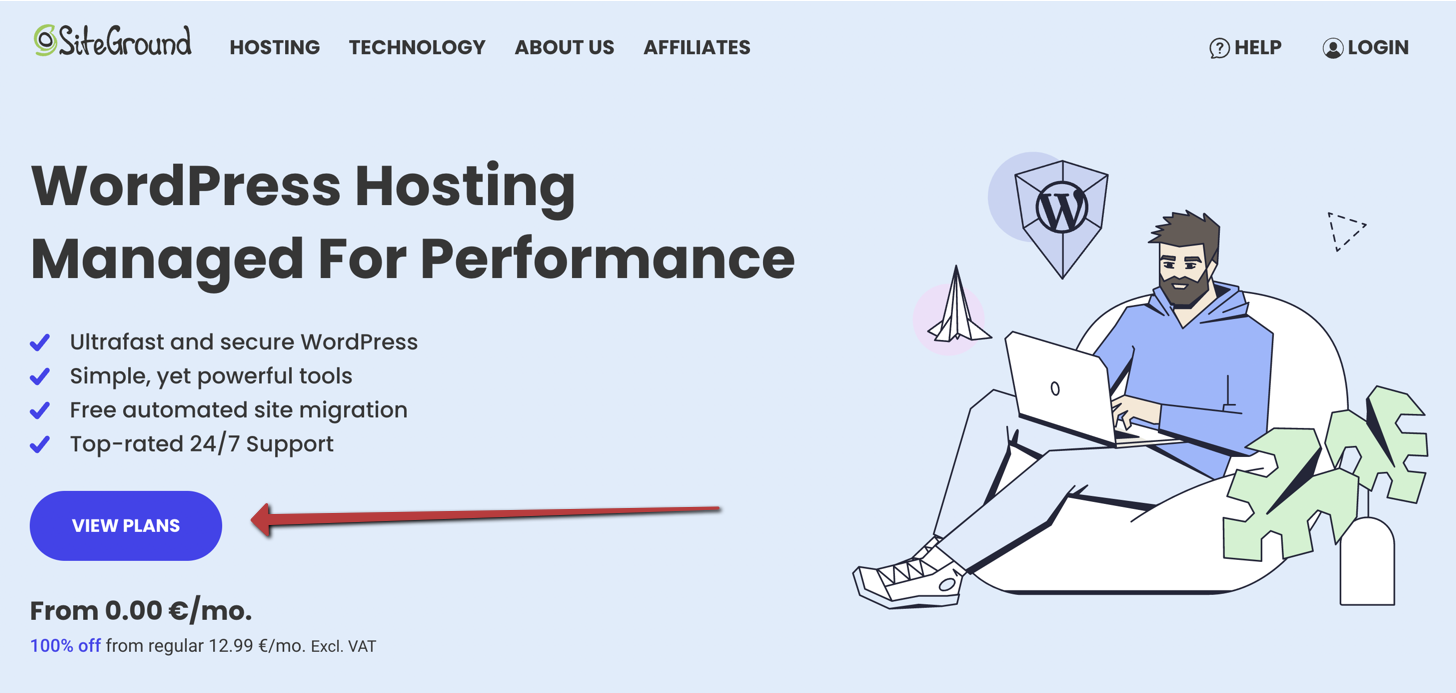
Click here to go to >> SiteGround << and start your own blog now! (The link will open in a new tab so you can reference these instructions as you work.)
To get started, click the blue “VIEW PLANS” button.
You’ll be asked to choose a plan.
While each of SiteGround’s plans has one-click WordPress install to make setting up your site easy, I recommend the GrowBig plan.
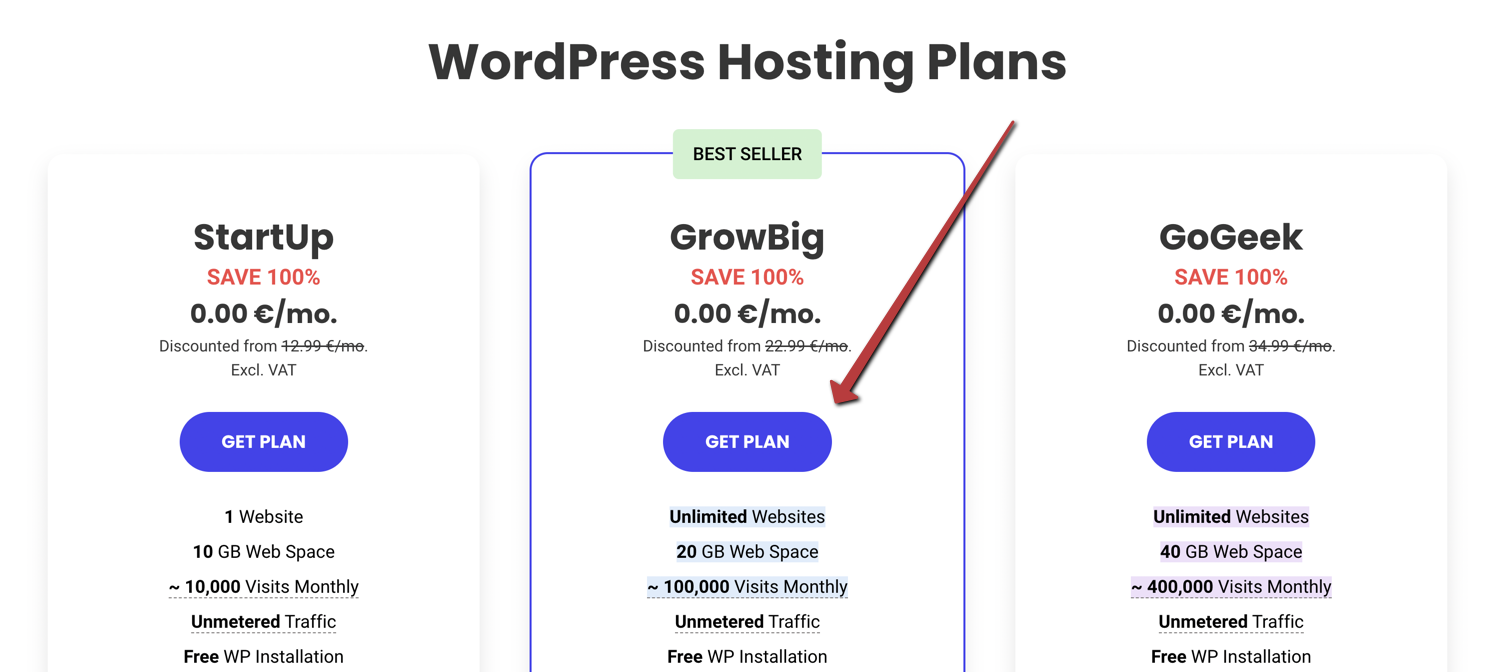
With the GrowBig plan, you get free backup restores of your site, SiteGround’s SuperCacher, which is a caching plugin that speeds up your website, and you get priority technical support in case you need anything. It’s worth the extra $24 if you can scrounge it.
With the GoGeek plan, you’ll get an even faster site and some other great features. But it is probably overkill if you’re just starting – you can always upgrade later, once you’re getting more traffic to your blog.
Choosing Your Domain Name
When deciding on a domain name, I recommend putting some thought into it before pulling the trigger. I made this document with tips on how to choose a domain name for your blog to help you out!
If you’re starting a travel blog, here’s an excellent guide to choosing a domain name.
Next, you’ll notice they also offer extra services—namely, their “Site Scanner”.
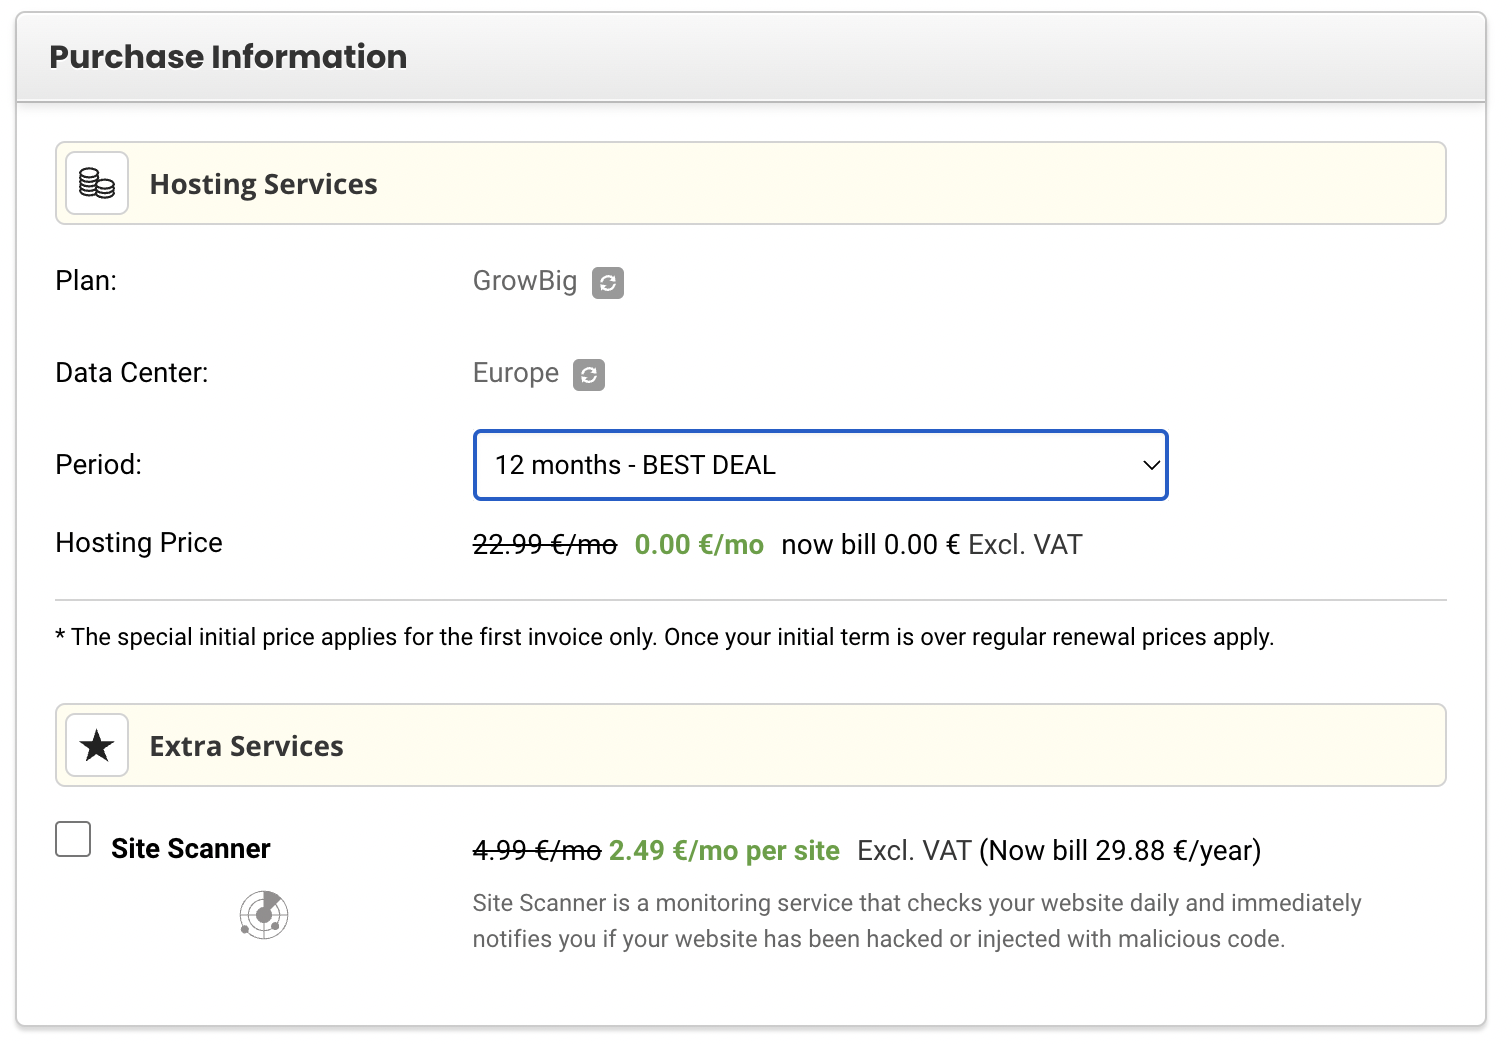
You don’t really need this. It will block malicious code, but as long as you’re careful about what you upload to your site, you should be fine.
Once you’ve purchased your hosting, you’ll be asked to setup your new hosting account. Select “Start a new website”, choose WordPress, and create your login information.

And that’s all there is to it! If you followed along, you now have your very own website and web hosting—congratulations! 🙂
FAQ: Help, I’m Stuck! What Do I Do?
If you get stuck somewhere during setup, contact SiteGround technical support. Calling is the best way to get help fast. They have access to your account (something I don’t have) and should be able to help.
SiteGround Support Number: 1(800)828-9231
To access your new site, go to your WordPress admin panel by typing yoursite.com/wp-admin into the URL bar.

Once you’re logged in, you’ll see a screen like this, except with fewer options:
Note: If you’re interested in even better, faster hosting, I recommend Kinsta! They are one of the best WordPress website hosts in the world. Check out my full Kinsta review here.
Step 3: Set Up Your Site & Pick a Theme
Once you’ve logged into your WP admin site, there are a few settings and things you’ll want to tweak to ensure the best possible start for your new blog.
Here’s what to do:
- Change The Title, Tagline, Time zone, and Favicon
- Change Your Permalink Structure
- Configure the Reading Settings
- Delete Unused Themes
- Install These Essential Plugins
- Change Your Domain From HTTP to HTTPS
- Set Up Google Analytics & Google Search Console
Let’s do it!
1. Change the Title, Tagline, Time Zone, and Favicon
To change these settings, head over to Settings > General.
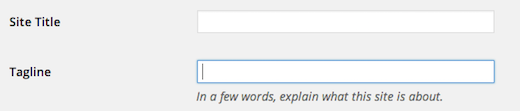
These settings will show up on your site with most themes, but you can always change them, so don’t stress about it. Next, scroll down and update your time zone.

Finally, most people forget to add a Favicon to their site. This is the little icon that appears in browser tabs.

Check out this guide to create and add a Favicon.
2. Change Your Permalink Structure
Your permalink structure is the way your WordPress post and page URLs are automatically created. The default WordPress permalink structure sucks, so you should change it.
Go to Settings > Permalinks and check off “Post name”.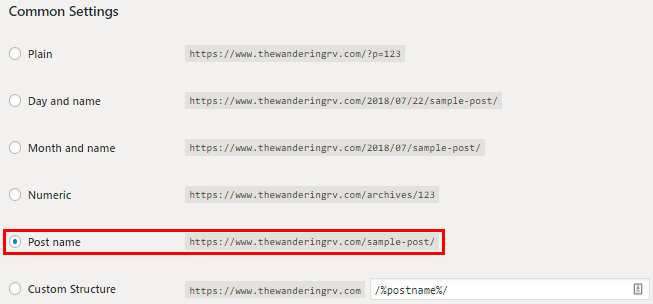
This option is the most SEO-friendly.
3. Configure the Reading Settings
Head over to Settings > Reading and choose whether you want your homepage to be a static page you create, or if you want it to be a feed of your latest blog posts.
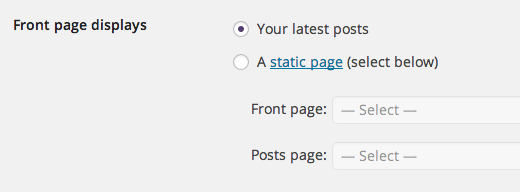
I prefer to have a static page I create, because I like to have set places I send people to (such as to specific blog content, products, the about page, etc.). But this is totally up to you.
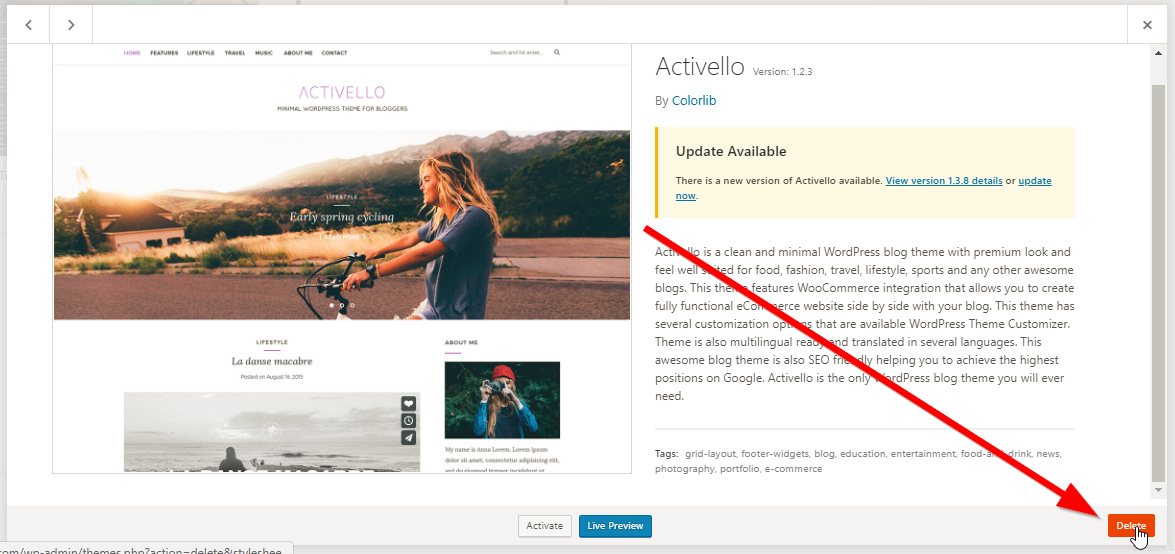
4. Delete Unused Themes
If you end up testing multiple themes (I share a bunch in the second half of this step), be sure to delete any you don’t use. This is important for two reasons:
- It’s a pain to keep themes updates.
- If you don’t update your themes, you may open your site up to hackers.
To delete old themes, go to Appearance > Themes, click on a theme, then click “Delete” in the bottom right corner.
5. Install These Essential Plugins
Plugins are pre-coded packages you can install on your WordPress site that add features without needing to know how to code.There are hundreds of thousands of plugins, but be careful of how many you install, because they can slow down your site a lot. And site speed matters.To install a new plugin, follow the instructions in this video:
Here are the 3 plugins I install on every new blog I build:
- Yoast SEO – This plugin helps you optimize your blog content for SEO (called on-page SEO) automatically. It will tell you what you need to do. And it’s free!
- BDOW – This one adds a social share bar to your blog posts to make it easy for your readers to share your content. And it’s free!
- Thrive Architect – While not required, I HIGHLY recommend this plugin. I used it to create almost all of my websites. It lets you design beautifully formatted blog posts with a drag and drop editor. It currently costs $299/yr.
6. Change Your Domain From HTTP to HTTPS
HTTPS, also called an SSL encryption, is a more secure version of your site. You’ve probably seen it before, the little green lock with the word “Secure”.

If your site isn’t secure (HTTP), then you’ll get the small “i” icon with a circle around it.

The “s” in HTTPS tells website visitors (and Google) that your site is safe and secure to browse. This is important for earning trust with your visitors and achieving higher search engine rankings, so make sure you don’t skip this step!
FAQ: How Do I Switch From HTTP to HTTPS on SiteGround?
SiteGround gives you an SSL certificate for free! To turn yours on, login to your SiteGround account by clicking on this link.
Click My Accounts > Manage Account > Go to cPanel.
From your cPanel, go to Let’s Encrypt > Action dropdown menu > HTTPS Settings.

A new popup will appear from which you can enable the HTTPS Enforce functionality of the tool and force secure connections on your website.
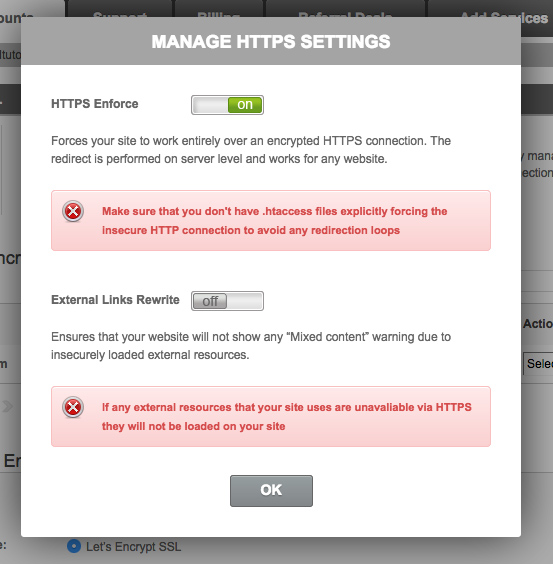
You should not have HTTPS in your URL. Woohoo!
To be sure, visit your site in another browser tab and see if it redirects to the HTTPS version. Note that it may take up to 24 hours to take effect.
7. Set Up Google Analytics & Google Search Console
Google Analytics allows you to see stats on your site, like how much traffic you’re getting, which blog post they’re visiting, tracking a sales funnel, and more.
It looks like this:

Analytics will be your best friend as your site grows.
Luckily, setup is fairly simple. Click here to access a simple, step-by-step guide to Google Analytics, or watch the video below.
Google Search Console is another free service offered by Google that helps you show up in Google search results and catch any errors on your site, among other things. Make sure you set it up!
While you won’t need to use it just yet, I recommend setting it up so it’s done and ready to go whenever you’re ready to use it. Watch the video below on how to set up Search Console:
And that’s all there is to setting up your site! Now it’s time to install a theme.
A WordPress theme is basically the look of your website, pre-packaged into a file – a lot like plugins, they allow you to design your site without needing to code anything.
Some themes are free, others are paid. Most of the free themes have issues, but there are a few that work really well.
Recommended Themes
I have either personally paid for and used, or know someone who has used, each of the themes below. They are all excellent choices!
Travel Blog Themes
Food Blog Themes
Foodie Pro ($125 – View Demo)
Fashion Blog Themes
Photography Blog Themes
Other Cool Themes
Academy Pro ($125 – View Demo)
Once you’ve chosen a theme, get it installed and activated. Instructions should have come with your theme, but if not, here’s a quick explainer video:
And now you’re ready to start writing blog posts!!
Step 4: Create a Content Calendar OR Just Start Blogging
There are two kinds of people…
Those who need a plan before they start, and those who prefer to start and plan later.
Only you know which of those two you are.
My advice? Create a rough plan of what you want (a certain monthly income, a certain number of site visitors, a certain number of email subscribers, etc.), then work backwards to determine what you need to do.
A wrong plan that you can tweak along the way is better than no plan!
If you want to start writing, skip to step 5. Otherwise, keep reading!
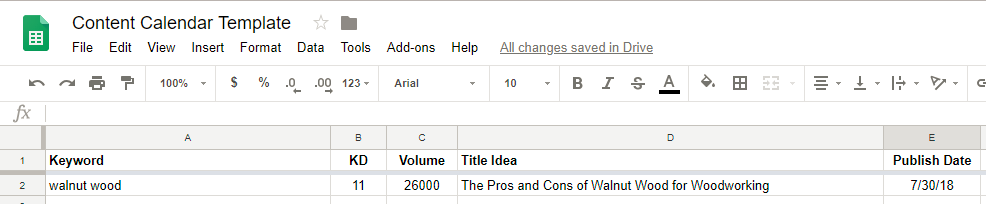
Creating a content calendar is simple. I recommend using a Google Spreadsheet to keep track of your topic ideas and target keywords you want those posts to rank for in Google.
Click here to get the spreadsheet I use to plan my content calendar (pictured below).
The reason I recommend targeting keywords with your blog posts is because you want your articles to show up in Google search results. We get 80+% of our traffic from Google, and it returns every single month without us needing to post on social media or send an email.
If you decided to get Ahrefs in Step 1, you’ll have a much easier time finding keywords. Check out this guide to keyword research to get started.
If you didn’t get Ahrefs, here’s a guide to keyword research with free tools. It’s less effective, but still gets the job done on a budget.
Once you’ve identified at least 10-20 solid keywords using the strategies above, it’s time to come up with title ideas for those articles, as well as publish dates. If you need more help deciding which topics to write about, use this ad revenue calculator to figure out the best ROI.
Here’s an explanation of how to use the Google Sheet:
Once you’ve brainstormed some content ideas, it’s time to start writing!
Step 5: Use This No-Brainer Content Outline to Start Writing
Not sure how to write your first blog post or where to get started?
I got you covered.
Over my 5+ years as a writer and content marketer, I’ve developed a simple outline that covers all the basics of writing a kick-ass article that can rank on Google. The best part?
You get it for free!
Click here to download my content outline template, then watch the video below to learn how to use it.
Now it’s in your hands to start writing. To publish your first ever blog post, head over to Posts > Add New in your WordPress dashboard.
Write in your title, update your URL to be search-friendly, and start writing! Here’s a video to help you learn all the features and get started:
And lastly, here are some guides to help you become a better writer:
- 6 Steps to Create Kickass Content
- The 3 Irrefutable Cornerstones Behind Writing Content That Matters
Step 6: Get Lots of Traffic Using These Simple Promotion Methods
Want to know one of the biggest mistakes new bloggers make?
It’s writing content then not doing anything to promote it.
Also called the “publish and pray approach”, this method is why most bloggers don’t earn money. They just write without getting people to actually see their articles!
So how do you avoid this pitfall?
Try these promotion techniques:
- The “set it and forget it” Pinterest traffic strategy (It’s written for eCommerce store owners, but works with any blog)
- Following a content promotion checklist
- Sharing your articles on Quuu Promote
These three things are more than enough to keep you busy. But don’t spend too much time on them – step 7 is crucial to earn money blogging.
Step 7: Build Relationships (and Links) to Rank on Google
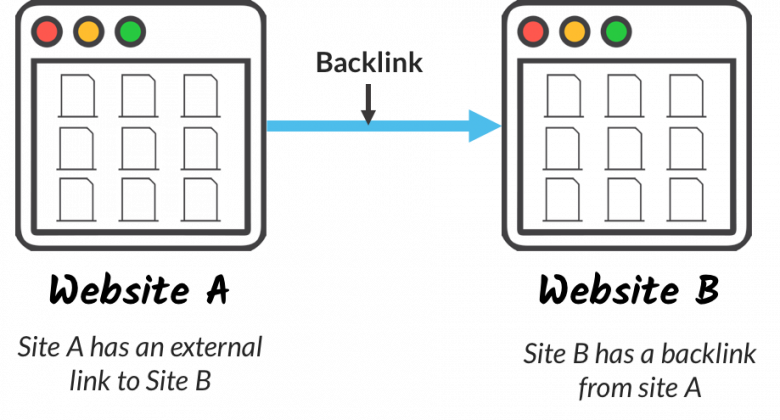
Backlinks are the backbone to first page Google rankings – and making loads of passive income.
If you don’t already know, a backlink is a link pointing to your website (more specifically, to the page on your website you’re trying to rank) from other websites.
Assuming you’re writing kickass content (which you should be, if you followed step 6), then backlinks are the key to making money blogging.
Unfortunately, getting them isn’t easy.
People don’t want to link out to just anything. To score a link, you have to meet three criteria:
- Your content is better than what’s already out there (see: Skyscraper Technique).
- Your content is relevant to the person you’re reaching out to.
- You’ve spent time building a relationship with that person OR you’re exceptionally good at sending cold emails.
To learn more about SEO and link building, follow these guides:
- White Hat SEO Case Study: How I Got 4,000+ Daily Visitors In Less Than 6 Months
- The Definitive Guide to Link Building for SEO
Step 8: Start Earning an Income Using These 5 Methods
Once you’ve got some traffic, it’s time to make some moolah!
As I alluded to in the first step, there are five main ways to monetize a blog:
- Affiliate Programs
- Paid Ads
- Physical Products
- Infoproducts
- Sponsored Posts
Let’s discuss each.
1. Affiliate Programs
Affiliate programs allow you to promote other people’s products and/or services in exchange for a commission on any sale you make.
This is my favorite way to make money blogging because you can simply write review articles (like the “best baby cribs”), rank them on Google, and watch the money flow in on autopilot.
Of course, doing that takes time – usually 6+ months – but it’s a continuous stream of revenue.
Some examples of affiliate programs include:
There are LOADS more, but these are the easiest to get started. I highly recommend this guide to affiliate marketing for more information.
Pro Tip!
If you use and love a particular product, but it isn’t on any of these affiliate programs or the commission sucks, you can always reach out to the manufacturer or main brand to negotiate a better commission.
Of course, you’ll have to send your traffic directly to them instead of Amazon, but you can get commissions as high as 50% instead of Amazon’s measly 1-6%.
2. Paid Ads
When you think of starting a blog and ways to make money, you probably think of ads first.
Putting ads on your blog post is the quickest and easiest way to make money. However, the payout is extremely low ($1-$5 per 1,000 visitors) and it makes your site look less trustworthy.
That said, ads can be a great way to monetize your informational content that doesn’t include affiliate links. That way it’s not hurting your conversions on the higher-priority pages.
If you’re interested in ads, check out this guide to Google AdSense.
3. Physical Products
Turning your blog into an eCommerce store is another great way to earn an income.
In fact, we recently did that with The Wandering RV – we sell fun shirts like this Wanderlust Shirt as an extra income stream.

Even if you don’t want to store and ship products yourself, you have two other options:
Easy peasy!
4. Infoproducts (or Digital Products)
Infoproducts are digital products that provide information, such as eBooks or online courses. They’re a great way to monetize a WordPress blog.
Online courses are hot right now, and only getting hotter. The reasons are obvious – for the learner, you get the best information condensed into a single place. For the course creator, you spend time upfront to create an asset that brings you money virtually forever.
You have two ways to sell digital products on your blog…
- Create your course on a platform like Teachable or Udemy
- Create a self-hosted course on your blog (more lucrative, but harder)
Both ways work; you just need to learn how to create a sales funnel and get customers on your course!
5. Sponsored Posts
Finally, we have sponsored posts – getting paid by a company to promote them via a blog post.
I mention this method last because you need a decent following to be able to offer sponsored posts. People won’t pay if you don’t have the eyeballs! Most people don’t have the traffic when first starting a blog.
But if you have a few hundred to a few thousand people on your email list and following you on social media, this is a great way to broaden your nest egg.
Want to learn more? Check out this guide to sponsored WordPress blog posts.
You Now Know How to Start a Blog and Make Money Online – What’s Next?
If you followed along, you now have your very own new blog. Hurray!
As I promised, if you stick to this for at least 6 months and really put in the work, you can start making money and eventually quit your day job.
I know people making $5k, $10k, and even $100k per month with nothing but their blog. (Yes, you read that right – six figures per month!)
Disclaimer: This WILL be overwhelming at first. That’s to be expected. You need to learn a lot, from becoming a good writer to learning about search engines, social media, email marketing, and more.
But don’t sweat it. Just take it one step at a time, and keep inching your way up that learning curve. The next 6 months will go by whether you do this or not – so you might as well try!
What’s your new blog URL? Share it with us in the comments below!
Read Next:SEO for Dummies: Beginner’s Guide to Search Engine Optimization